We've got a new version of .NET Core and a new version of Entity Framework Core (EF Core). Unfortunately, EF Core 2.1 hasn't made it any easier to deploy database migrations from DLLs rather than from the source code. (sigh) Deploying EF Core migrations from DLLs is a key feature for DevOps CI/CD stuff -- especially if you're doing "The Right Thing" and splitting your builds from your releases. For example, using VSTS Builds to compile your code and then VSTS Releases to deploy your apps into one or more environments.
Thankfully, there are options. If you're trying to deploy EF migrations from TFS or VSTS, you can use my Build & Release Tools extension. If you're using something else, I've got a batch script for you. I've been maintaining both of these for a while and with this release, I've taken some suggestions from the community and added some new features.
Option #1: TFS / VSTS Extension
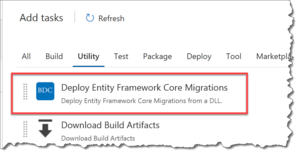
It's free. Go download and install this extension. After you've installed that extension, you can add the Deploy Entity Framework Core Migrations step to your build definition or release definition.
The updated version that I pushed out on 7/4/2018 now give you the option to split your Entity Framework code & migrations DLL from the startup project that you'll use to deploy your migrations. For example, if you've got an ASP.NET Core web project and then also an API project that has your EF stuff in it, the new version of the extension now handles this.
In order to enable this, the extension now requires that you provide the class name of your DbContext. Don't worry...you don't have to provide the full namespace. You just have to provide the class name. This new feature also lets you have multiple DbContext classes in your code and each of those DbContexts can have their own migrations.
To support how all the Entity Framework dependencies are now handled in .NET Core, you'll need to provide the name of your runtimeconfig.json file for your deployed application. If you don't do this, you'll run into errors where your EF Core dependencies won't properly resolve.
Option #2: Batch Script
I originally wrote a batch script for EF Core v1 and included it in a blog post and then updated it for EF Core 2.0. This script does almost exactly the same thing as what "dotnet ef database update" does except that it references your already compiled DLLs instead of your source code.
One of the hardest parts of scripting this is trying to figure out where ef.dll is on disk. The script tries to find ef.dll in a couple different places but if it can't find it, the script will fail. If you don't want to deal with that uncertainty, you can now just manually put ef.dll into the same directory as the script and the script will use that copy.
There are a handful of minor changes to the args for this new version of the script. The first argument is now the filename for your migrations DLL (it used to be just the namespace). There are now a couple of optional args. Argument #2 is the startup DLL filename and argument #3 is your DbContext class name.
deploy-ef2dot1-migrations.bat migrationsDllName [startupDllName] [dbContextClassName]
The startup DLL filename arg is handy for that multi-DLL scenario that I discussed above. The DbContext class name arg is helpful for when you have multiple DbContext classes in your project.
Here's a link to download the EF Core 2.1 migration deploy script.
Anyway, I hope this helps.
-Ben
-- Looking for help with Entity Framework Core? Need some assistance getting EF Core working with your team's DevOps pipelines? Want someone to come help your team figure out why integrating, building your code, and deploying your apps is so difficult and make it a whole lot less difficult? We can help. Drop us a line at info@benday.com.

