So there's VSCode (aka. Visual Studio Code) and there's Visual Studio 2019. If you're developing an ASP.NET Core MVC application using Visual Studio 2019, when you're running the application in debug mode, if you modify one of your cshtml views, your application that's running in the browser automatically picks up the change. Without having to do anything special, VS2019 just makes that happen. In VSCode, this edit-and-continue of cshtml views is still possible but it requires some configuration. (And when you're done you can do C# compilation, too.)
TL;DR -- the default autogenerated tasks.json and launch.json files need to be modified. Make launch.json point at the watch task and then set the working directory for the watch task in tasks.json. Here's some sample code: https://github.com/benday-inc/vscode-dotnet-watch-aspnet.
In VSCode, it all comes down to configuring your tasks.json and launch.json files. The difficulty is that the documentation for how to do this with ASP.NET Core MVC is -- uhhhh -- a little sparse.
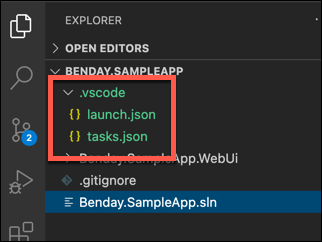
Visual Studio Code's launch.json and tasks.json configuration files
When you open pretty much any .NET Core-based project in VSCode, the editor will helpfully offer to generate tasks.json and launch.json files for your project automatically. You'll get a dialog that says "required assets to build and debug are missing from ''. Add them?" If you click 'yes', you'll get the default tasks.json and launch.json files for your project.
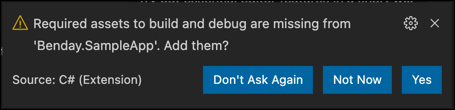
VSCode and the OmniSharp C# plugin prompts you to auto-generate tasks.json and launch.json files
The tasks file (tasks.json) defines all the commands you want to run against your project. The launch file (launch.json) defines all that way that you'd start your application from Visual Studio Code.
The files that get created for you are good and they let you get to running your application without having to do much more than press the 'F5' button. But! If you're developing cshtml-based views, every time that you tweak the contents of the view, you have to stop the debugger and recompile/restart the app. That's no fun and it slows down the workflow.
dotnet watch to the rescue
Good news! You don't have to live with this annoyance.
There's a tool that comes with .NET Core (dotnet) that fixes this problem. It's called 'dotnet watch'. Dotnet watch monitors the files in a particular directory or directory tree and issues a command if it notices a change to a file. For example, let's say that you've got your ASP.NET Core MVC application running in the debugger and you make a change to one of your cshtml views. If you started your debug session using 'dotnet watch', your code will automatically get recompiled and you'll see that change to the view in your browser.
Change launch.json to start using 'dotnet watch' instead of 'dotnet build'
As I mentioned above, the launch.json file governs the ways that you can start your application from within Visual Studio Code. The auto-generated launch for an ASP.NET Core MVC application starts by running the 'build' task that's defined in tasks.json. If that build task successfully completes, then launch.json starts your application by calling something like "dotnet run MyApp.dll".
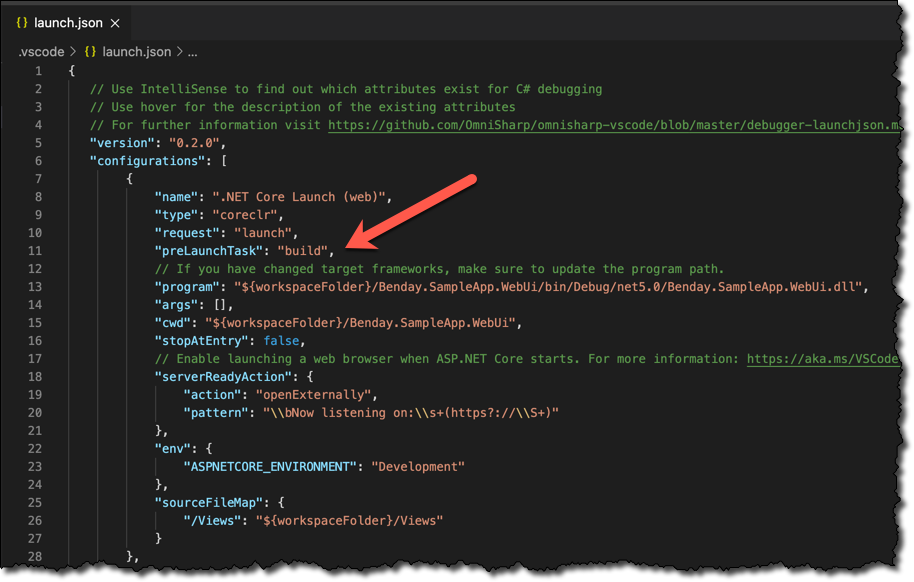
The auto-generated launch.json for an ASP.NET Core application starts with a 'build'
Since the auto-generated tasks.json file not only has a 'build' task but also a 'watch' task, you'd think that you would be able to just modify the launch.json to point at that task. Basically, change the preLaunchProperty from 'build' to 'watch'.
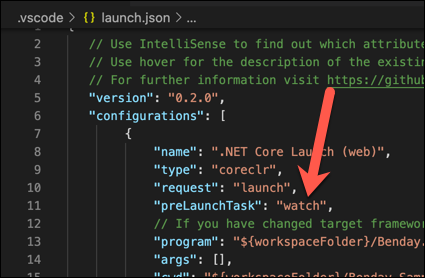
In launch.json, change the preLaunchTask from 'build' to 'watch'
If you do that, you'll get an error in VSCode's Terminal tab that says:
watch : Could not find a MSBuild project file in '/Users/benday/code/temp/Benday.SampleApp'. Specify which project to use with the --project option.

Error generated by dotnet watch when you start from launch.json
Well, that's annoying.
What's going wrong?
What's going wrong? It's saying that you have to specify the .csproj file that dotnet watch is supposed to watch. That doesn't seem right considering that launch.json is going to eventually issue a 'dotnet run' command against a DLL rather than a project. Knowing the syntax of 'dotnet watch' a bit, its default happy state is to be called from the directory that contains the ASP.NET Core project file (*.csproj). When launch.json gets around to firing off a 'dotnet run', the directory that it launches from is the directory we want.
Why is 'dotnet watch' so cranky?
Well, the default 'dotnet watch' command that's in tasks.json doesn't specify a launch directory (current working directory) so it's almost definitely being started from the root of the workspace. This folder is called the 'workspace folder' and it can be accessed via the '$" variable. In most cases, the $ value is not the same as the folder for your web project because the web project's code is kept in a separate folder -- anything other than the root of the workspace.
Set the working directory for 'dotnet watch'
The key to making 'dotnet watch' happy is to set its current working directory. You can do this by adding a value for 'cwd' to its task entry.
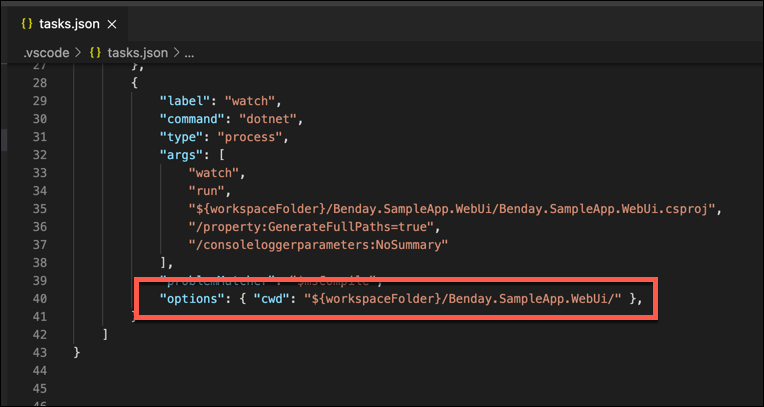
Add the 'cwd' option to the dotnet watch task to specify its working directory
{
            "label": "watch",
            "command": "dotnet",
            "type": "process",
            "args": [
                "watch",
                "run",
                "${workspaceFolder}/Benday.SampleApp.WebUi/Benday.SampleApp.WebUi.csproj",
                "/property:GenerateFullPaths=true",
                "/consoleloggerparameters:NoSummary"
            ],
            "problemMatcher": "$msCompile",
            "options": { "cwd": "${workspaceFolder}/Benday.SampleApp.WebUi/" },
        }
The value for 'cwd' should start with the $ and then have the path to the folder that contains the csproj file for your ASP.NET Core MVC application.
Summary
Now that you've modified launch.json and tasks.json, when you start debugging your ASP.NET Core MVC application from within Visual Studio Code, it'll run with dotnet watch. That means that you'll be able to make changes to your C# code and your cshtml views as you go and everything is automatically recompiled.
Cool, huh?
Here's a link to a sample project with launch.json and tasks.json already set up for dotnet watch.
I hope this helps.
-Ben
-- Need some development or architecture help on your .NET Core project? Want to get continuous integration or continuous delivery working using GitHub Actions or Azure DevOps Pipelines? Looking to improve your use of Scrum or Kanban? We can help. Drop us a line at info@benday.com.