This is Chapter 4 of Azure Cosmos DB for .NET Developers. Previous: Chapter 3: How Cosmos DB Is Structured.
Last chapter we looked at how Cosmos DB is organized — Database, Container, Partition Key, id — and we wrote some code to save and read a Note document. But we haven't actually run any of it yet.
Let's fix that.
The Emulator: Your Local Cosmos DB
You could create a Cosmos DB account in Azure and run against the cloud, but that (probably) costs money from minute one and means you're making HTTP calls to Azure every time you want to test something during development. Not awful but not ideal.
The better answer is the Azure Cosmos DB Emulator. It runs on your machine, implements the same API as the cloud service, and costs nothing. Your code connects to https://localhost:8081 with a well-known key, and everything works the same as it would against a real Cosmos account. (Disclaimer: the data operations work the same way which is good for development but the performance details are nothing like the real thing.)
There are four versions of the Cosmos DB Emulator:
- Windows application
- Windows Docker container
- Linux Docker container
- vNext Linux emulator (preview)
The Windows Version
The Windows-based emulator has been around since 2016 and when it finally arrived, it was kind of big deal. Developers had been asking for it for a long, long time so that they didn't always have to make calls to the real Cosmos DB version in the cloud. It's built to run on Windows only. You can download it from Microsoft's site and it gives you Microsoft.Azure.Cosmos.Emulator.exe, which is installed by default at %ProgramFiles%\Azure Cosmos DB Emulator.
Ten years on (I'm writing this in 2026), this version of the emulator is showing its age. It's kind of slow to start even on a beast of a dev machine and I find myself frequently wrestling with vague error messages. Once it's up and running, it works well on an x64-based Windows machine. You can run it on Windows ARM64 but it's slower and grumpier.
Windows Docker Container Version
There's a Windows Container version that you can download from mcr.microsoft.com/cosmosdb/windows/azure-cosmos-emulator. Rumor has it that this is essentially Microsoft.Azure.Cosmos.Emulator.exe wrapped and running in a container. It's unclear whether this is officially still supported or not. It requires running on an x64 processor.
Linux Docker Container Version
There's also an x64-based Linux container version of the emulator. This is where stuff starts to get kinda weird.
I work on an Apple Silicon Macbook about 90% of the time and I really wanted to get this version of the emulator running on my machine. No matter what I tried it just wouldn't work but being a total nerd, I just couldn't take "not supported" for an answer. So I cracked open the container image and started looking around. It's been a while since I did this digging but at the time, it appeared to be running in some kind of strange Windows-on-Linux emulator mode.
Essentially an emulator inside of an emulator. Which explains why this version was/is ultra buggy even on x64 hardware and why it just plain refuses to run on ARM or Apple Silicon.
The vNext Emulator
Enter the completely new version of the emulator. The "vNext" emulator is still in preview but it's under active development and it's gotten really good. I use this one all the time. It no longer has the x64 limitations that the previous versions had and happily runs on Docker Desktop via WSL2 on Windows, x64 Linux, Apple Silicon Macs, Windows on ARM, and ARM versions of Linux. I use this version all the time to run integration tests during GitHub Actions builds.
It's tremendous and the setup is easy. Setting it up is basically: install Docker, pull the Docker image, run the container.
What the vNext Emulator Supports (and What It Doesn't)
The vNext emulator is still in preview and under active development. The good news: the stuff you need for day-to-day development is almost all there. The bad news: there are a few gaps that might surprise you.
What works: CRUD operations (create, read, update, delete, patch), batch and bulk APIs, Change Feed, partitioned collections, TTL expiration, queries with filters and projections, JOINs (single and multi-level), ORDER BY, aggregates, range operators, paging, and subdocument queries. That covers the vast majority of what you'll do in application development.
Not yet implemented: Custom index policies, Request Unit reporting, collection performance management, parallel cross-partition queries, and collection feed reads. The RU reporting gap is worth knowing about — you won't get accurate RequestCharge values from the emulator, so cost testing needs to happen against a real Cosmos account.
Not planned (ever): Stored procedures, triggers, and UDFs. If your application architecture depends on server-side execution, the vNext emulator can't help you. (My opinion: this is fine. I don't use stored procedures or triggers with Cosmos anyway, and I'd recommend against building dependencies on them. They're not that useful.)
Also worth noting: The .NET SDK doesn't support bulk execution in the emulator, and by default the vNext emulator starts in HTTP mode. The .NET SDK requires HTTPS, so you need to add --protocol https when starting the container.
For the full feature matrix, check Microsoft's documentation.
Running the vNext Emulator
If you can't tell by this point, I'll say it directly: I think you should use the vNext emulator.
Install Docker and then use the following commands to run it:
# Pull the emulator image
docker pull mcr.microsoft.com/cosmosdb/linux/azure-cosmos-emulator:vnext-preview

# Run it
docker run --name cosmosdb --detach --publish 8081:8081 --publish 1234:1234 \
  -e PROTOCOL=https \
  mcr.microsoft.com/cosmosdb/linux/azure-cosmos-emulator:vnext-preview \
  --protocol https
Here's the PowerShell script I actually use to manage the emulator. You can download the startup script here. It handles pulling the latest image, cleaning up stale containers, and starting with the right protocol settings:
# PowerShell script to start Azure Cosmos DB Emulator in Docker
# Usage: .\start-cosmos-db-emulator.ps1 [-Remove] [-Pull]

param(
    [switch]$Remove,
    [switch]$Pull
)

if ($Remove) {
    Write-Host "Stopping, killing, and removing any existing 'cosmosdb' container..."
    docker stop cosmosdb 2>$null
    docker kill cosmosdb 2>$null
    docker rm cosmosdb 2>$null
}

if ($Pull) {
    Write-Host "Pulling the latest Azure Cosmos DB Emulator Docker image..."
    docker pull mcr.microsoft.com/cosmosdb/linux/azure-cosmos-emulator:vnext-preview
}

# Start the Cosmos DB Emulator container
Write-Host "Starting Azure Cosmos DB Emulator container..."
docker run --name cosmosdb --detach --publish 8081:8081 --publish 1234:1234 `
  -e PROTOCOL=https `
  mcr.microsoft.com/cosmosdb/linux/azure-cosmos-emulator:vnext-preview `
  --protocol https

# Show exposed ports
Write-Host "Exposed ports for 'cosmosdb' container:"
docker port cosmosdb

Write-Host
Write-Host "The admin site is available at http://localhost:1234 "
Once it's running, open http://localhost:1234 in your browser for the data explorer — a UI for browsing databases, containers, and documents. The Cosmos DB endpoint itself is at https://localhost:8081. We're going to use the data explorer to look at what Cosmos actually stores.
The emulator's endpoint key is a well-known string that Microsoft publishes in their docs. It's not a secret — it's a local emulator, there's nothing to protect.
Creating the Database and Container
Before we can save documents, we need to create the database and container. You can do this through the admin UI but you can also do it using code. Here's the setup code:
// Create database if it doesn't exist
var databaseResponse = await client.CreateDatabaseIfNotExistsAsync(
    "NotesDb",
    throughput: 400  // Request Units per second — 400 is the minimum
);
var database = databaseResponse.Database;

// Create container with partition key
var containerProperties = new ContainerProperties
{
    Id = "NotesContainer",
    PartitionKeyPath = "/ownerId"
};

var containerResponse = await database.CreateContainerIfNotExistsAsync(
    containerProperties
);
var container = containerResponse.Container;
The PartitionKeyPath is a JSON path — /ownerId — pointing to the property in your documents that Cosmos will use as the partition key. And as we discussed last chapter: this is set at creation time and can never be changed. (I won't belabor the point again. But I've been burned by it, so I keep mentioning it.)
The throughput: 400 is provisioned Request Units per second. 400 is the minimum and it's fine for development. We'll talk more about RUs and cost in a later chapter.
Running the Code
Here's the Note class from last chapter — a simple domain model we're using to test things out:
public class Note
{
    // Yes, I know that 'id' is not using PascalCase
    public string id { get; set; } = Guid.NewGuid().ToString();
    public string OwnerId { get; set; } = string.Empty;
    public string Title { get; set; } = string.Empty;
    public string Body { get; set; } = string.Empty;
    public DateTime CreatedDate { get; set; } = DateTime.UtcNow;
    public List<string> Tags { get; set; } = new();
}
Now let's run the save-and-read code from last chapter:
var note = new Note
{
    OwnerId = "user-123",
    Title = "First Cosmos Note",
    Body = "Look ma, no boxes!",
    Tags = new List<string> { "cosmos", "getting-started" }
};

// Save
var saveResponse = await container.UpsertItemAsync(
    note,
    new PartitionKey(note.OwnerId)
);
Console.WriteLine($"Saved. Cost: {saveResponse.RequestCharge} RUs");

// Read
var readResponse = await container.ReadItemAsync<Note>(
    note.id,
    new PartitionKey(note.OwnerId)
);
Console.WriteLine($"Read. Cost: {readResponse.RequestCharge} RUs");
You'll see something like "Saved. Cost: 6.29 RUs" and "Read. Cost: 1 RUs." That point read — fetching a single document by partition key + id — is the cheapest operation in Cosmos. Usually 1 RU.
But now open the data explorer at http://localhost:1234 and look at what's actually in the database.
What Cosmos DB Actually Stores
Navigate to NotesDb → NotesContainer and click on the document. You'll see something like this:
{
    "id": "a1b2c3d4-e5f6-7890-abcd-ef1234567890",
    "ownerId": "user-123",
    "title": "First Cosmos Note",
    "body": "Look ma, no boxes!",
    "createdDate": "2026-03-28T14:30:00.0000000Z",
    "tags": [
        "cosmos",
        "getting-started"
    ],
    "_rid": "KfE0AJkbewcBAAAAAAAAAA==",
    "_self": "dbs/KfE0AA==/colls/KfE0AJkbewc=/docs/KfE0AJkbewcBAAAAAAAAAA==/",
    "_etag": "\"00000000-0000-0000-abcd-ef1234567890\"",
    "_attachments": "attachments/",
    "_ts": 1711633800
}
Your properties are all there — ownerId, title, body, tags. Serialized to camelCase JSON. The tree survived the trip to storage.
But there's a bunch of stuff you didn't put there. Those underscored properties are system properties that Cosmos adds to every document automatically. Let's go through them.
The Ones You Can Ignore
_rid — an internal resource identifier. Cosmos uses this internally. You won't interact with it (and Microsoft says you shouldn't try.)
_self — a URI path to the document. Also internal.
_attachments — a legacy feature. Ignore it.
Next, on to the ones that are useful.
_ts — The Timestamp
_ts is a Unix timestamp (seconds since epoch) representing when the document was last modified. Cosmos updates this automatically on every write. You don't set it, you can't control it, it's always there.
Useful for debugging ("when was this last touched?") and it's the basis for TTL (time-to-live) policies if you ever want documents to auto-expire. But day-to-day, it's mostly a "good to know it's there" thing.
_etag — The One That Matters a Lot
This is the important one. I'd go so far as to say that after partition keys, understanding _etag is the most practically important thing in this chapter.
_etag is a value that changes every time the document is updated. It's Cosmos DB's mechanism for optimistic concurrency — and understanding it will save you from a category of bugs that are really hard to diagnose after the fact.
Optimistic concurrency is a method of handling multiple people trying to update the same record and making sure that you aren't stomping on each other's changes.
Here's the scenario. Two users load the same note at the same time. User A changes the title and saves. User B changes the body and saves. Without concurrency protection, User B's save overwrites User A's title change. User A's edit is silently lost. Nobody gets an error. The data is just quietly wrong.
The _etag prevents this. The pattern works like this:
- Read the document. Capture the
_etagvalue. - Make your changes.
- Save and pass the
_etagvalue along to Cosmos along with a directive that says "only accept this save if the_etaghasn't changed." - If someone else modified the document in the meantime, the
_etagwill have changed. Cosmos rejects the save with a 412 Precondition Failed.
In code:
// Step 1: Read and capture the ETag
var readResponse = await container.ReadItemAsync<Note>(
    noteId,
    new PartitionKey(ownerId)
);
var note = readResponse.Resource;
var etag = readResponse.ETag;

// Step 2: Modify the document
note.Title = "Updated Title";

// Step 3: Save with concurrency check
try
{
    await container.UpsertItemAsync(
        note,
        new PartitionKey(note.OwnerId),
        new ItemRequestOptions
        {
            IfMatchEtag = etag
        }
    );
    Console.WriteLine("Saved successfully.");
}
catch (CosmosException ex) when (ex.StatusCode == System.Net.HttpStatusCode.PreconditionFailed)
{
    Console.WriteLine("Conflict! Someone else modified this document.");
    // Reload, merge changes, retry — your decision
}
This works. But look at all the manual plumbing. You have to remember to capture the ETag from the read response. You have to remember to pass it in ItemRequestOptions on the write. You have to catch a specific CosmosException with a specific HTTP status code.
If you forget any of those steps? You just don't have concurrency protection. Silently. The save succeeds. The other user's changes vanish. And nobody finds out until someone notices the data is wrong, which might be weeks later.
The raw SDK gives you the mechanism but not the safety net. (Don't worry...I'll show you some code in the next chapter that'll help you out.)
The Silent Cross-Partition Problem
There's another slightly jagged edge I want to show you, and it's the one that costs people extra money in production. (Oh...and potential performance problems, too.)
Let's query for all notes belonging to a user. Here's the right way — specifying the partition key:
var query = new QueryDefinition(
    "SELECT * FROM c WHERE c.ownerId = @ownerId"
).WithParameter("@ownerId", "user-123");

var options = new QueryRequestOptions
{
    PartitionKey = new PartitionKey("user-123")
};

var iterator = container.GetItemQueryIterator<Note>(query, requestOptions: options);

var notes = new List<Note>();
double totalRUs = 0;

while (iterator.HasMoreResults)
{
    var batch = await iterator.ReadNextAsync();
    totalRUs += batch.RequestCharge;
    notes.AddRange(batch);
}

Console.WriteLine($"Found {notes.Count} notes. Cost: {totalRUs} RUs");
That's a single-partition query. Cosmos goes directly to the "user-123" partition, finds the matching documents, returns them. Fast. Cheap.
Now watch what happens when you leave out the partition key:
var options = new QueryRequestOptions
{
    // No PartitionKey specified
};
The query still works. Returns the correct results. But now Cosmos fans out to every partition in the container to find matching documents. More RUs. More time. Worse as your data grows and you introduce more partition keys and therefore more partitions.
And the SDK says nothing. No warning. No log message. No exception. It silently does the expensive thing and charges you for it.
In the emulator with a handful of documents, you might not even notice the difference. But in production with real data across thousands of partitions, this is the kind of thing that shows up as a surprise on your Azure bill. And nothing in the code tells you it's happening.
Taking Stock
Across these last two chapters, we've gone from concepts to running code. The raw SDK works. You can connect, save, read, query, and handle concurrency. The tree goes in, the tree comes out.
But the developer experience has some real friction:
You construct PartitionKey objects manually on every operation. Forget it and the SDK silently does something expensive.
Concurrency control is opt-in and manual. Forget a step and you silently lose data.
Querying requires ceremony. Build a query definition, create request options, get an iterator, loop through pages, accumulate results. A lot of scaffolding for "give me the matching documents."
The SDK doesn't protect you from expensive mistakes. Cross-partition queries look identical to single-partition queries in the code. The only difference shows up in the RU charges.
Nothing connects to the concepts from Chapters 1-2. Where are the aggregate roots? Where's the domain model pattern? The SDK doesn't know about any of that. It doesn't enforce document boundaries. It doesn't know your Note class is a domain object. It's just serializing JSON.
Every one of these friction points is a place where the discipline has to come from you. And as I said back in Chapter 1 — discipline doesn't scale as well as we'd like to think it does.
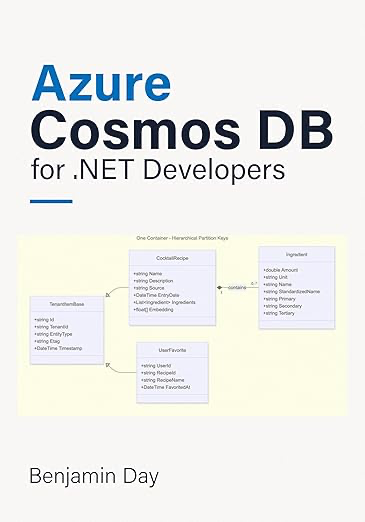
In the next chapter, we'll take every one of these pain points and show what happens when the discipline comes from a utility library instead. When TenantItemBase carries its partition key automatically. When the repository builds the right PartitionKey for every query without you thinking about it. When cross-partition queries get detected and logged instead of silently executed. When optimistic concurrency is handled by the base class, not by you.
The raw SDK isn't bad. It's just — well — raw. Let's make it better.