In the discussion thread for my DevOps Skills class at Pluralsight, I got a question about how to deploy database changes in a build using Entity Framework Migrations (aka. EF Code First Migrations). It's actually pretty easy and it all comes down to a tool that comes with Entity Framework called migrate.exe. When you deploy your Entity Framework migrations using the Visual Studio Package Manager and call 'Update-Database', it ultimately ends up calling the same logic that is used by migrate.exe. Pretty much anything that you can call from the command line can be hooked into a TFS automated build.
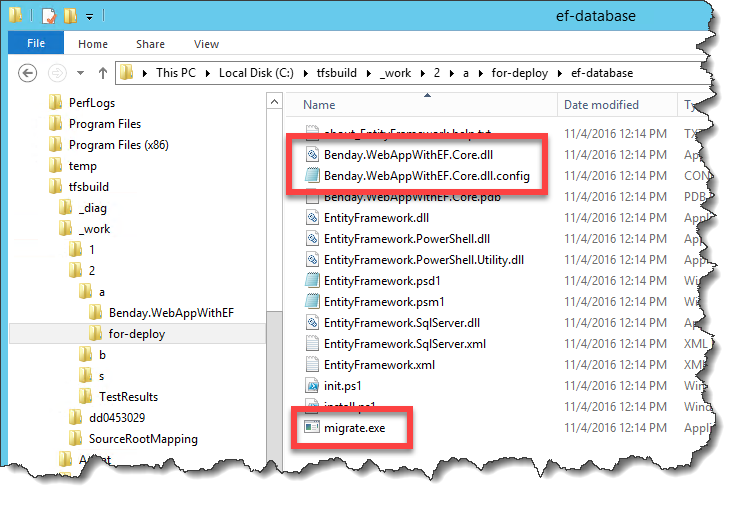
To keep everything easy and clean in your build, I'd recommend creating a directory in the artifacts folder of your build that will contain everything that you need to do your EF migrate calls. What you'll need are the DLLs and config file for your Entity Framework code plus the contents of the Entity Framework NuGet Package folder. I usually create a folder called 'for-deploy' and then put the various pieces of my deployments in subfolders. What you end up with is a folder that looks like the screenshot below. You've got a folder in the artifacts directory of your build ("$(build.artifactstagingdirectory)\for-deploy\ef-database") that has the DLLs and config file for my app's entity framework code plus the bits for Entity Framework itself -- most importantly, migrate.exe.
[caption id="attachment_9181" align="alignnone" width="754"] Deployment directory in my build that contains the Entity Framework DLLs for my app plus the contents of the Entity Framework NuGet package.[/caption]
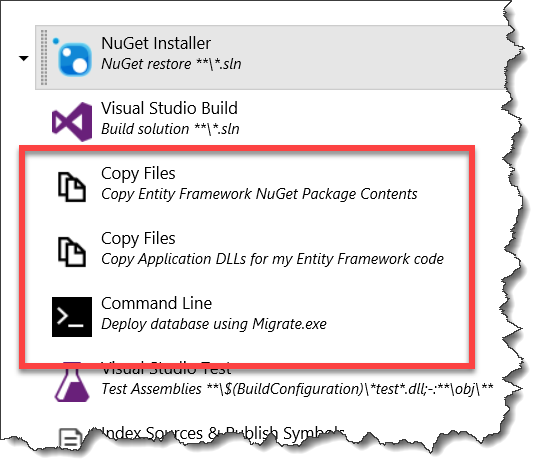
In the build definition, you just start with a standard default build for a Visual Studio project. From there, you'll add two Copy Files tasks and a Command Line task. The first task copies the Entity Framework package contents. Next, copy the Entity Framework data access DLLs for your project. Finally, use a Command Line task to call Migrate.exe to deploy the database.
[caption id="attachment_9201" align="alignnone" width="546"] Create the for-deploy directory and deploy the database with Migrate.exe[/caption]
Here are the arguments for the build steps. The values here are example values and you'll need to change them to match the names of your code and Entity Framework version that you're using. I'm also only specifying the non-default values for the steps. If I don't mention a value, don't change the default.
STEP #1 Step Type: Copy Files Step Name: Copy Entity Framework NuGet Package Contents Step Source Folder: $(build.sourcesdirectory)\Benday.WebAppWithEF\packages\EntityFramework.6.1.3\tools\ Target Folder: $(build.artifactstagingdirectory)\for-deploy\ef-database Advanced / Over Write: True
STEP #2 Step Type: Copy Files Step Name: Copy Application DLLs for my Entity Framework code Source Folder: $(build.sourcesdirectory)\Benday.WebAppWithEF/Benday.WebAppWithEF.Core/bin/$(BuildConfiguration) Target Folder: $(build.artifactstagingdirectory)\for-deploy\ef-database Advanced / Over Write: True
STEP #3 Step Type: Command Line Step Name: Deploy database using Migrate.exe Tool: $(build.artifactstagingdirectory)\for-deploy\ef-database\migrate.exe Arguments: Benday.WebAppWithEF.Core.dll /startupConfigurationFile=Benday.WebAppWithEF.Core.dll.config Advanced / Working folder: $(build.artifactstagingdirectory)\for-deploy\ef-database
After you've added these steps to your build, be sure to save your changes then run the build.
NOTE: if the connection string in the app.config / web.config is not appropriate for your build environment, you'll need to modify it before running the Migrate.exe step.
I hope this helps.
-Ben
-- Need help getting Entity Framework Migrations included into your build, test, and deploy process? Want some assistance getting a DevOps flow flowing at your company? Looking training on this stuff? We can help. Drop us a line at info@benday.com.


