In my last post, I talked about how to create an ASP.NET Web Application that's easy to deploy from your Team Foundation Server vNext Build (TFS Build vNext). Well, part of the pain of deploying an ASP.NET Web Application (ASP.NET MVC or ASP.NET Web Forms) from a build is dealing with database connection strings. So how do you edit the connection strings in web.config or app.config from a TFS vNext Build?
My technique is to use a utility I wrote called EditConnectionString. Guess what it does. Yah. It edits connection strings in web.config and app.config. The syntax is super simple:
EditConnectionString /filename:config_file_path /name:connection_name /value:new_connection_string_value
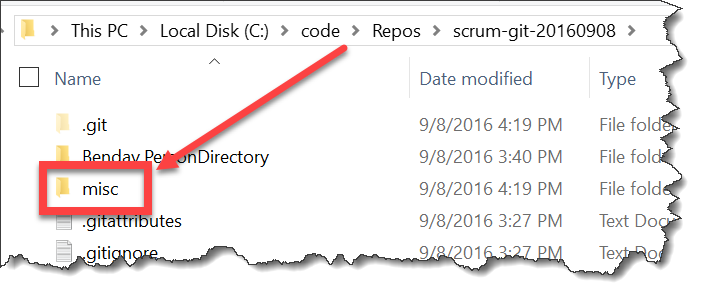
Since I want to use this utility from my build, I need to put it somewhere that the build agent can reference it. There are a bunch of different ways that this could be done but I think that the easiest one is to create a folder off the root of my source control repository called "misc" and put EditConnectionString.exe in there.
[caption id="attachment_8371" align="alignnone" width="706"] Put EditConnectionString.exe in a directory called "misc"[/caption]
Once you've got that exe added to version control, then you can add a Command Line task to your build to trigger it. Open your build definition and click Edit. Then click the Add build step button. Click on Utility. Click on Command Line and then click the Add button.
[caption id="attachment_8391" align="alignnone" width="999"] Add a command line task to your build definition[/caption]
Now that you have the Command Line step in your build definition, drag it to wherever you want it to be in the step order. I usually do this step right after the Visual Studio Build step. Set the Tool value to the path to EditConnectionString.exe. If you put the exe in a directory named 'misc' then the value should be "$(build.sourcesdirectory)\misc\EditConnectionString.exe". Set the Arguments value to be the command line arguments for EditConnectionString.exe. Assuming that you used the filesystem deploy model that I sketched out in my last blog post, then the web.config file will be somewhere in the artifacts directory.
The args below use /filename to reference web.config, /name to refer to the name of the connection string in web.config, and /value is the connection string value that you want to use. I'd highly recommend using a variable for your connection string rather than hard-coding it.
/filename:"$(build.artifactstagingdirectory)\for-deploy\website\web.config" /name:"(default)" /value:"$(ConnectionString)"
When you're done, it should look something like the image below.
[caption id="attachment_8401" align="alignnone" width="1024"] Call EditConnectionString.exe from the Command Line step[/caption]
Now that you've got that set up, you can save and run your build. When the build finishes executing, check out the Artifacts for the build and you'll find that the connection string has been updated and you're ready to deploy.
Here's the link to the source code. Here's the link to the binary.
I hope this helps you out.
-Ben
-- DevOps got you down? Need help with automated builds and releases for your Scrum team? Looking for some TFS & Scrum training? We can help. Drop us a line at info@benday.com.


