I spent a bunch of time over the last few months trying to get my monthly Azure spend for Slide Speaker to go down. I had a bunch of resources that ran 24/7 that I converted to be more on-demand.
The core of my problem is that I have some work that requires a logged in user in order to run. When I started writing Slide Speaker, I just accepted this as requiring a constantly running Azure Virtual Machine. Since those VMs were always going to be running, I didn't worry too much about being efficient about background job processing. I had lots of spare cycles on those VMs and I decided to run a bunch of miscellaneous background jobs as services on those VMs.
It worked well enough. But those VMs were pretty expensive.
First I moved those background jobs in to Azure Container Jobs. (More on the design of that in a future post.). Then I started working on problem of the constantly running virtual machines.
TL;DR: the Azure Virtual Machine infrastructure removes your custom sysprep unattend.xml OOBE phase settings and replaces it with its own. Almost anything you want to customize that's part of the OOBE phase of creating a Windows machine, is unavailable in an Azure Virtual Machine.
AI (Not) to the Rescue!
Part of my process these days is to ask ChatGPT what it thinks. That turns into a conversation -- a back and forth -- about how things could be implemented and what the options are.
One of the options was Azure Virtual Machine Scale Sets. Since I knew that the VM jobs were triggered by Azure Queue messages, this seemed like a natural choice because there were so many features that aligned with what I needed.
- Scale down to 0 VM instances when nothing was happening? ✅
- Scale up (add VM instances) when an Azure Queue message arrived? ✅
- Run the VMs with ephemeral OS disks to make them start faster and run faster? ✅
- Managed identity for stuff on the VM so that I could streamline security? ✅
- Custom application logic and config that goes into a customized OS image in Azure Compute Library? ✅
- Minimal disk usage ✅
- Minimal bill for compute? ✅
- Use sysprep with an unattend.xml to configure auto-login? ✅
All the way down, this was looking good. And Copilot and ChatGPT were cheering me on the whole way.
But there's some bad news that went with this. No matter what I did, I couldn't get this to actually work.
Azure Virtual Machines & Sysprep: Not 100% Compatible
It all looked so good. But there was a little detail about how Azure VMs work that Copilot and ChatGPT didn't know about. I didn't know about it either.
Sysprep is a tool that comes with Windows that allow an administrator to create a re-usable OS image from an existing system. Basically, get the computer set up the way you want -- install software, add configurations, etc etc etc -- and then run sysprep.exe to "generalize" the system so that you can create new similar copies of this installation. If you're managing a ton of computers, sysprep is a life-saver and helps you save hours and hours and hours of system setup time.
Now what does this have to do with Azure Virtual Machine Scale Sets? Well, VM scale sets basically create multiple instances of an operating system image on-demand. You can use regular default images of Windows if you want, but typically, you're going to want/need to customize your image so that it has all the bits that your application needs.
If you want a custom image for your Azure VM Scale Sets, then sysprep is one of your first tasks.
Here's the rough overview of the process:
- Create an Azure VM from a base image of Windows
- Log in and customize to your heart's content.
- When you're ready, run sysprep. Sysprep runs and your Azure VM shuts down.
- From the Azure Portal, you'll "capture an image"
- The image goes into an Azure Compute Library
- Configure the Azure VM Scale Set to point to your image in the Azure Compute Library
- Run the scale set.
- Azure scales the number of VM instances up or down depending on the configuration rules that you set.
That's how it's supposed to work...but I ran into some problems with the sysprep process.
Some More Sysprep Details
Sysprep has a bunch of phases and what's a little confusing is when and where these phases get executed. It feels like it all happens on the original -- but in reality, most of the logic runs on the startup of the subsequent, downstream, new machines.
For repeatability, all these phases are configured using an xml file called unattend.xml. This file contains the settings and configurations for each phase.
The first phase is the only one that runs on the original, source machine that you're sysprepping. That's the "generalize" phase. Generalize pretty much just anonymizes the machine. And when the generalize phase is done, the source machine is automatically shut down.
Phase
Description
Generalize
Removes system- and hardware-specific info for image capture
Specialize
Customizes the image to a specific machine on first boot
OOBE
Interactive first-run experience for the end user
Audit
Optional mode for configuring/testing before OOBE
When the new machine is first started using the sysprep'd image as a source, it runs the Specialize phase. Specialize commonly is used to setup networking, join domains, and other system level customizations.
Then you get to the Out-of-Box-Experience (OOBE) phase. This handles the configuration for the user of this new machine. It's also the phase where I had most of my Azure VM Scale Set configs for my custom application.
The XML below is a copy of the unattend.xml OOBE phase configuration that I was using with sysprep.
- Set the user locale to en-us
- Create a local user account and add it to the local administrators group
- Set a bunch of "oobe" variables so that the user isn't prompted a bunch of OneDrive, networking, and backup settings. Essentially just configure it to be able to log in and go.
- Configure auto-login so that as soon as the machine boots up, the local user is logged in.
...
<settings pass="oobeSystem">
    <component name="Microsoft-Windows-International-Core"
                processorArchitecture="amd64"
                publicKeyToken="31bf3856ad364e35"
                language="neutral"
                versionScope="nonSxS"
                xmlns:wcm="http://schemas.microsoft.com/WMIConfig/2002/State"
                xmlns:xsi="http://www.w3.org/2001/XMLSchema-instance">
        <InputLocale>en-US</InputLocale>
        <SystemLocale>en-US</SystemLocale>
        <UILanguage>en-US</UILanguage>
        <UserLocale>en-US</UserLocale>
    </component>
    <component name="Microsoft-Windows-Shell-Setup"
                processorArchitecture="amd64"
                publicKeyToken="31bf3856ad364e35"
                language="neutral"
                versionScope="nonSxS">
        <CopyProfile>true</CopyProfile>
        <UserAccounts>
            <LocalAccounts>
                <LocalAccount>
                    <Password>
                        <Value>super-secure-password</Value>
                        <PlainText>true</PlainText>
                    </Password>
                    <DisplayName>local user account</DisplayName>
                    <Name>pptxrender</Name>
                    <Description>local user account</Description>
                    <Group>Administrators</Group>
                </LocalAccount>
            </LocalAccounts>
        </UserAccounts>
        <OOBE>
            <HideEULAPage>true</HideEULAPage>
            <HideOEMRegistrationScreen>true</HideOEMRegistrationScreen>
            <HideOnlineAccountScreens>true</HideOnlineAccountScreens>
            <HideWirelessSetupInOOBE>true</HideWirelessSetupInOOBE>
            <ProtectYourPC>3</ProtectYourPC>
            <SkipMachineOOBE>true</SkipMachineOOBE>
            <SkipUserOOBE>true</SkipUserOOBE>
        </OOBE>
        <AutoLogon>
            <Password>
                <Value>super-secure-password</Value>
                <PlainText>true</PlainText>
            </Password>
            <Enabled>true</Enabled>
            <LogonCount>100</LogonCount>
            <Username>pptxrender</Username>
        </AutoLogon>
    </component>
</settings>
...
The Problem: Azure Virtual Machines Hijacks OOBE
This all worked fine when I ran it on a Hyper-V machine. It didn't work when I ran it on an Azure VM. Whatever I did, none of the settings that I had in the OOBE phase configuration ever seemed to appear on my Azure VM.
- ❎ No auto-login
- ❎ No local user
- ❎ No "just ready to go" experience
- ❎ Always prompted for backing up my PC and a whole bunch of other config stuff on the first login
The problem is that when a Windows machine is created for the first time on Azure, the Azure VM infrastructure short-circuits/hijacks/totally replaces the contents of your sysprep unattend.xml file. The reason that none of that was working was because -- well -- it was getting wiped out by Azure itself.
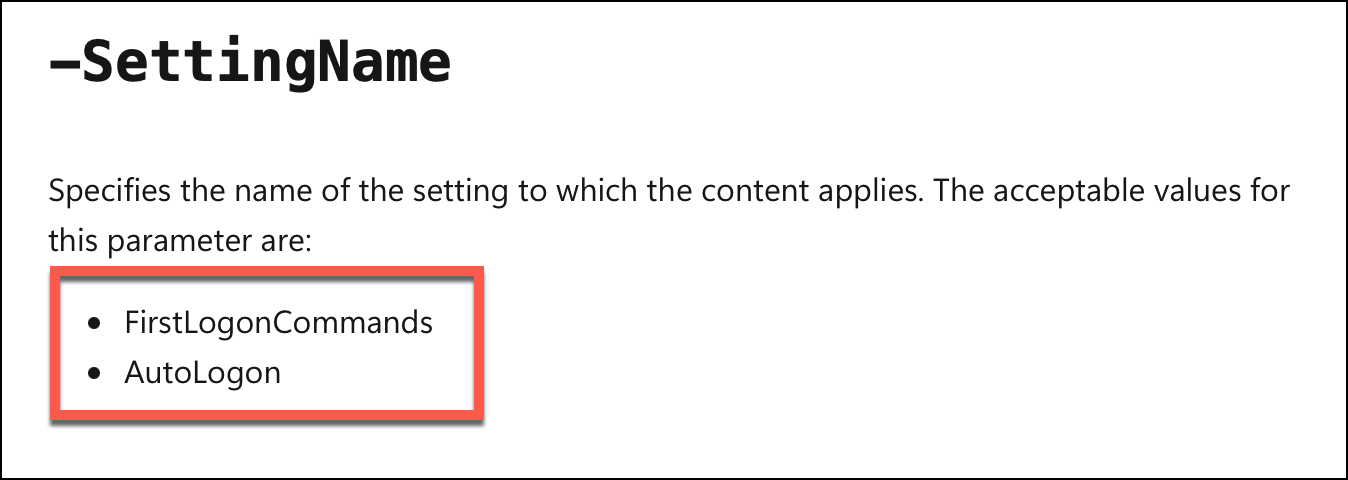
I only found this out by accident when I was (desperately) reading the documentation for the Az.Compute powershell module. There's a command named Add-AzVMAdditionalUnattendContent. What Add-AzVMAdditionalUnattendContent allows you to do is pass a limited subset of the settings that are available in the sysprep OOBE phase. The example that's provided in the documentation shows you how to configure auto-logon on an Azure Virtual Machine.
$AvailabilitySet = Get-AzAvailabilitySet -ResourceGroupName "ResourceGroup11" -Name "AvailabilitySet03"
$VirtualMachine = New-AzVMConfig -VMName "VirtualMachine07" -VMSize "Standard_A1" -AvailabilitySetID $AvailabilitySet.Id
$Credential = Get-Credential
$VirtualMachine = Set-AzVMOperatingSystem -VM $VirtualMachine  -Windows -ComputerName "Contoso26" -Credential $Credential
$AucContent = "<UserAccounts><AdministratorPassword><Value>" + "Password" + "</Value><PlainText>true</PlainText></AdministratorPassword></UserAccounts>";
$VirtualMachine = Add-AzVMAdditionalUnattendContent -VM $VirtualMachine -Content $AucContent -SettingName "AutoLogon"
But like I mentioned above, the Add-AzVMAdditionalUnattendContent command only allows a subset of values to be specified via the -SettingName parameter. All you get are FirstLogonCommands and AutoLogon.
That wasn't going to work for me and that was the end of the road for me using Azure Virtual Machine Scale Sets.
Summary
In the end, what looked like a perfect solution on paper turned into a frustrating dead end. Azure Virtual Machine Scale Sets checked all the boxes for scalability, performance, and cost—but the inability to fully control the sysprep OOBE phase ultimately made it unworkable for my needs. Azure’s infrastructure silently replaces critical parts of your unattend.xml, rendering most OOBE customizations—like auto-login and user setup—useless. After weeks of trial, error, and deep dives into documentation, I had to abandon this path. If your VM workloads depend on user login or any rich OOBE automation, tread carefully with Azure Scale Sets—this might not be the road for you.
I burned a LOT of hours on this. I really hope this post saves someone out there some time.
-Ben