I've been teaching a lot of Scrum classes lately and almost all the teams that I've been working with have been struggling with backlog refinement. Specifically, backlog refinement with Azure DevOps.
Backlog Refinement
The Product Backlog is the list of all requirements that might ever be implemented as part of the product. Like any list of stuff, it can get messy fast. Since your Product Backlog is the representation of your vision for the future of your product, you want to keep it well-understood and organized.
So what is backlog refinement? It's the process that a scrum team goes through to keep their product backlog ready and readable. Some teams call this process 'backlog grooming' but more and more often you hear it said as 'backlog refinement'.
Why do backlog refinement? There's always more work to do than is doable in any reasonably short period of time. Requirements -- also known as Product Backlog Items (PBIs) -- are proposed and pile up faster than the team can develop and deliver them. In order to make sure that you're working on the right things and that everyone understands the priorities and scope, you need to periodically discuss these PBIs with the team. The goal is to create a 'Ready' product backlog and 'Ready' product backlog items. A PBI meets the criteria of 'Ready' when it is well understood and is sized appropriately so that it can be delivered in a sprint.
This refinement process can be tedious and overwhelming at times so it's a good idea to do regular refinement meetings. My recommendation is twice a week and to keep the meetings to about 30 minutes.
Backlog Refinement with Azure DevOps
Azure DevOps Services and Azure DevOps Server both have great tools for managing your Product Backlog. It's easy to put new requirements in via the web interface, add as much detail as you'd like to those requirements, and to move them around to represent the priority of those requirements.
What I don't think is always super easy is using Azure DevOps to support backlog refinement. The problem is that the state values for User Story (Agile template) and Product Backlog Item (Scrum template) work items focus on tracking work that is already in-progress. Out of the box, the states for those work items don't really handle how potential work is treated before it's selected to be worked on.
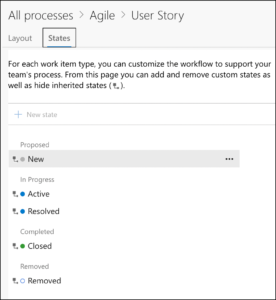
Here are the state values for a User Story in the Agile process template:
New
Active
Resolved
Closed
Removed
State values for a User Story in the Agile process template
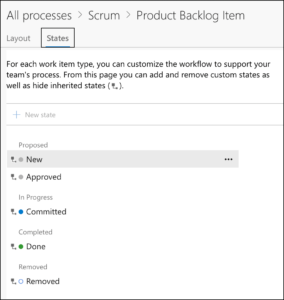
Here are the state values for a Product Backlog Item (PBI) in the Scrum process template:
New
Approved
Committed
Done
Removed
State values for a Product Backlog Item in the Scrum process template
What's Wrong with the Work Item States?
For both of these work item types, they start out in the 'New' state. To me, 'New' doesn't say much of anything about what the Product Owner thinks about that work item other than it's something that we're tracking. It doesn't mean that we're going to do it or that we've put much (or any) thought into it, we're simply putting it on our list of stuff that we might possibly do. I'd rather record the idea as 'New' rather than not recording it and possibly forgetting something that might ultimately be important.
The next out-of the-box states in Azure DevOps are 'Active' for User Stories and 'Approved' for Product Backlog Items. If you're working with the Scrum process template, 'Approved' isn't terrible -- it gives us the ability to say that we're officially thinking about that requirement. If you're working with the Agile process template, going directly from 'New' to 'Active" pretty much stinks.
To fix this, we need a way to categorize our requirements so that we can track what's 'New' vs. what's officially part of the product backlog (aka. not completely insane as an idea) vs. what's been refined enough that it's ready.
Streamline Backlog Refinement with Additional States
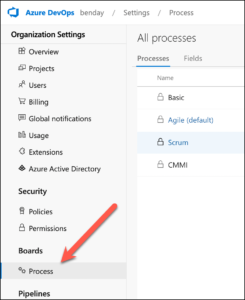
Thankfully, Azure DevOps allows us to add additional states to our work items. To do this, you'll go to Organization Settings for your Azure DevOps account or Azure DevOps Server and then choose Process. From there, you can go to your work item types, click the States tab, and then add/remove/rename your work item states.
Access the Process Template Editor from the Organization Settings in Azure DevOps
For both of those work item types -- Product Backlog Item or User Story -- I'd suggest adding two states: Needs Refinement and Ready for Sprint. If you're using the Scrum process template, you might want to consider removing the 'Approved' state since it basically is the same thing as 'Needs Refinement'.
What do the Work Item States Mean?
Once you've added these states, it's a lot easier to keep track of the pre-implementation requirements. 'New' means that the requirement is unconsidered. 'Needs Refinement' means that it's something that we care about but that the team doesn't fully understand yet. 'Ready for Sprint' means that the team has done backlog refinement on that requirement and feels confident that it's ready to be accepted into a Sprint (aka. ready to be worked on).
After those states, you're in to development. 'Active' for a user story and 'Committed' for a PBI mean that it's been selected into a sprint. In the Agile process template, the user story's 'Resolved' state means that it's completed implementation and needs to be reviewed. Once that user story has been reviewed and accepted as done, it moves to 'Closed'. In the Scrum template, the PBI's 'Done' state means that the implementation of the requirement is done according to the team's Definition of Done.
Summary
Backlog refinement can be a little tricky in Azure DevOps unless you customize some things. Thankfully, the customizations are pretty easy. Just add two states: 'Needs Refinement' and 'Ready for Sprint'. After that, it's a lot easier to keep track of what work is ready to be worked on in a Sprint.
I hope this helps.
-Ben
Looking for help learning Scrum? Need a hand figuring out how to do Scrum with Azure DevOps? Is your project in trouble? We can help. Drop us a line at info@benday.com.


